SCT-013 current sensor
-
Hi Robert,
thanks for you support,I try this way , please, the componets how many watts and tolerances?
Thanks advance
-
Note. BE CAREFUL when testing to avoid an electric shock! I used an isolating variable output transformer for my tests to be safe.
Watts: the only part of interest is R6. So you have:
P = 230 * 230 / 390000 0.136 W
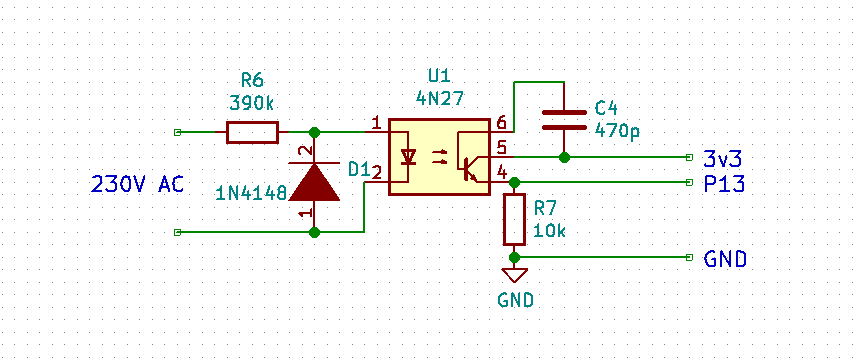
So that is negligible. The critical property of R6 is voltage capability. You have to get a 350V RMS type. That's typically better for higher power resistors. So get a 0.5W or 1W type.
The value of the resistor is to be determined. Since the transfer ratio of the optocoupler varies, you have to select a proper value such that at 230 V the output at R7 is about 2Vpp. You need an oscilloscope to tell. If you just have a Multimeter, use 0.7V AC. Below is a modified script capturing data from P13 and P14 (current and voltage). It returns the raw values and the phase difference between the two signals. That phase difference may have an offset, since the voltage signal is only half of the sine wave.
# import gc import math import array from utime import sleep_ms, sleep_us, ticks_us, ticks_diff from machine import ADC, Timer, idle, enable_irq, disable_irq, Pin, SPI # # acquire ADC values. The paramters of the constructor are: # 1. the mains frequency (number, typically 50 or 60) # 2. the sampling period (ms). The default is 2 ms. # class Acquire: def __init__(self, freq=50, *, sample_period=2): self.sample_period = sample_period self.omega = 2.0 * math.pi * freq / (1000 / sample_period) self.coeff = 2.0 * math.cos(self.omega) self.freq = freq self.adc = ADC(bits=9) def start(self, pin1, pin2, time=200): gc.collect() # avoids automatic gc during sampling self.pin_adc1 = self.adc.channel(pin=pin1, attn=ADC.ATTN_11DB) self.pin_adc2 = self.adc.channel(pin=pin2, attn=ADC.ATTN_11DB) self.samples = time // self.sample_period # Test code for creating the artificial signal for phase noise # self.pi_f = (2 * math.pi * self.freq) / 1000000 # angle step per us # self.start_us = ticks_us() self.count = 0 self.busy = True self.q1_1 = 0.0 self.q2_1 = 0.0 self.q1_2 = 0.0 self.q2_2 = 0.0 self.alarm = Timer.Alarm(self.read_adc, 0, us=(self.sample_period * 1000 - 3), periodic=True) def stop(self): self.alarm.cancel() def read_adc(self, alarm): state = disable_irq() v1 = self.pin_adc1() v2 = self.pin_adc2() # Test code using an artificial Signal # v1 = math.sin(ticks_diff(ticks_us(), self.start_us) * self.pi_f) # v2 = math.sin(ticks_diff(ticks_us(), self.start_us) * self.pi_f) enable_irq(state) self.q0_1 = v1 + self.coeff * self.q1_1 - self.q2_1 self.q2_1 = self.q1_1 self.q1_1 = self.q0_1 self.q0_2 = v2 + self.coeff * self.q1_2 - self.q2_2 self.q2_2 = self.q1_2 self.q1_2 = self.q0_2 self.count += 1 if self.count >= self.samples: self.alarm.cancel() self.busy = False def result(self): while self.busy == True: sleep_ms(self.sample_period) real = self.q1_1 - self.q2_1 * math.cos(self.omega) imag = self.q2_1 * math.sin(self.omega) amplitude_1 = 2 * math.sqrt(real * real + imag * imag) / self.count phase_1 = math.atan2(real, imag) real = self.q1_2 - self.q2_2 * math.cos(self.omega) imag = self.q2_2 * math.sin(self.omega) amplitude_2 = 2 * math.sqrt(real * real + imag * imag) / self.count phase_2 = math.atan2(real, imag) # diff = 40e-6 * 2 * self.freq * math.pi # phase diff caused by 40µs sampling delay phase = phase_1 - phase_2 - diff # if phase > math.pi: phase -= 2 * math.pi elif phase < -math.pi: phase += 2 * math.pi return amplitude_1, amplitude_2, phase def reading(self, pin1, pin2, time): self.start(pin1, pin2, time) return self.result() # def run(period = 500, n=10): acq = Acquire(50.0, sample_period=1) # 50 Hz l=[] for _ in range(n): value = acq.reading("P13", "P14", period) l.append(value[0]) print (value, math.cos(value[2])) avg = sum(l)/n sqsum = 0 for _ in l: sqsum += (_ - avg) * (_ - avg) print ("average: ", avg, "SDev:", math.sqrt(sqsum/n)) -
@robert-hh
Hello,
I built my electronic circuit, now how should i use the result of the value [2] to get the correct voltage?value = acq.reading("P13", "P14", 500)
print(value[2])Thank a lot
-
@Stefano-Floriani The values returned by acq.reading are the two values from P13 and P14 and the phase difference phi between the signals at P13 and P14. So if P13 is connected to the SCT013 sensor, and P14 to the voltage sensor, you will get the current I from value[0], and the voltage U from value[1]. The number in value[2] can then be used to calculate the effective power consumed by the load, which is
Peff = U * I * cos(phi)
with I derived from value[0], U derived from value[1] and phi being value[2], which already has the proper scaling. The number cos(phi) is called the power factor. It is 1 for pure resistive loads, and 0 for pure capacitive or inductive loads. Values close to 1 are common, values close to 0 are rare.
-
@robert-hh
Dear Robert,
The reading voltage with external voltmeter it's:
At 230 v and U from value[1] it's from 4
At 220 v and U from value[1] it's from 2How can I find the right formula?
Thanks a lot
-
@Stefano-Floriani In that case the signal at P14 is way too small. For 230 V you should get a reading in the range of about 150 for a 9 bit ADC setting (see the chart and table in my previous post).
You can either reduce the value of the 390k resistor R6, or increase the value of the 10k resistor R7. You may also try to remove C4, because that one also reduces sensitivity. When the setting is right, you should measure with an multimeter an AC voltage of about 0.7 V~.
The transfer ratio of optocouplors vary a lot. -
I'm so sorry, I thought you did the tests with the resistances, I don't have the equipment or material to try.
Thanks you
-
@Stefano-Floriani I tested with the values in the schematics. But the optocouplers vary a lot between individual items and families. So the resistor values have to be determined for each and every item.
Thats one of the reasons I suggested using a small transformer. The variation in the transfer ratio of small transformers at their nominal load is way lower, only like 10%. -
@robert-hh
this is the result running your script:
run()
(0.07947586, 5.907588, -0.961557) 0.5722438
(0.0303492, 5.957881, -1.419681) 0.1505412
(0.05318971, 5.931093, 0.2570791) 0.9671368
(0.08792933, 6.089819, -0.7879818) 0.7052775
(0.07133265, 5.925827, -0.5397768) 0.8578235
(0.1326455, 5.954846, -0.7830648) 0.7087548
(0.1046322, 5.97505, -0.6961006) 0.7673484
(0.09087696, 5.942791, -0.4167922) 0.9143923
(0.02481544, 5.990963, 2.182606) -0.57435
(0.08708447, 6.019161, 0.1956226) 0.9809269
average: 0.07623314 SDev: 0.03126099
I have used two resistor 390k ,10k at one watt . -
@Stefano-Floriani Obviously you are running without load. Then the phase is not stable. But the value for voltage is still too low to be of use. What type of optocoupler are you using? I used a 4N27 type.
This kind of circuitry is hard to set up without any kind of measuring tool. -
-
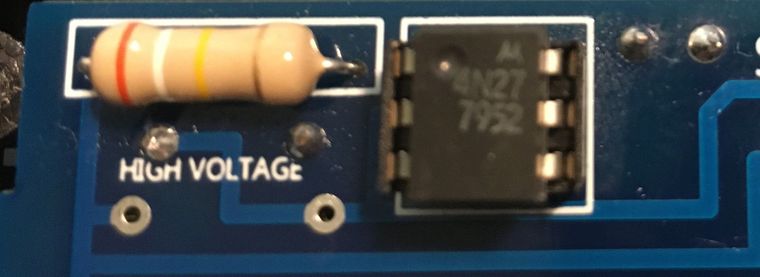
@Stefano-Floriani Looks like a Motorola device. Comparing the data sheets, they look similar. The device I used seems to have a higher CTR, but not by a factor of 40 different.
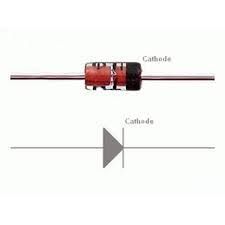
Ar you sure that you assembled the diode D1 in the right direction? If not, the LED current will be way lower.P.S.: The PCB design is dangerous! There is not a sufficient distance between the high voltage and low voltage side! Traces from the HV side MUST NOT lead to the LV side. And in a safe design there would also be a cut in the PCB below the chip between the HV and LV side.
-
@Stefano-Floriani You could try to use other optocouplers, like 4N37, which has a higher current transfer ration (CTR). But again, this circuitry is using a chip designed for digital mode in an analog mode. That makes finding the right values difficult.
Edit: Other devices with higher CTR: CNY17-4
-
-
Please, How many volts should there be at the output of the 390k resistor?
-
@Stefano-Floriani At the output of the 390k resistor (input of the Photocoupler) there should be the diodes voltage, which is about 1 Volt AC. Over the 390k resistor you should have 230V.
At the 10k resistor a good voltage is 2 V peak-peak or ~0.7 V AC.
-
-
@Stefano-Floriani That's better. The capacitor worked here as a means to suppress noise. You can also increase the value of R7 to 27k. Then the value should be at about 150.

Hello! It looks like you're interested in this conversation, but you don't have an account yet.
Getting fed up of having to scroll through the same posts each visit? When you register for an account, you'll always come back to exactly where you were before, and choose to be notified of new replies (either via email, or push notification). You'll also be able to save bookmarks and upvote posts to show your appreciation to other community members.
With your input, this post could be even better 💗
Register Login